
Before You Dive In
If the envelope tells sphereneNXT what shape to fill, Cell Parameter tells it how to fill it. This is the core of the technology; it defines how your geometry gets created, so it's worth taking the time to understand it properly rather than just accepting the defaults.
The Cell Parameter panel has five main sections: Infill Type, ADMS Type, Select Method, Choose Input Method, and the cell size value itself. Each one builds the last, so we'll go through them in order.
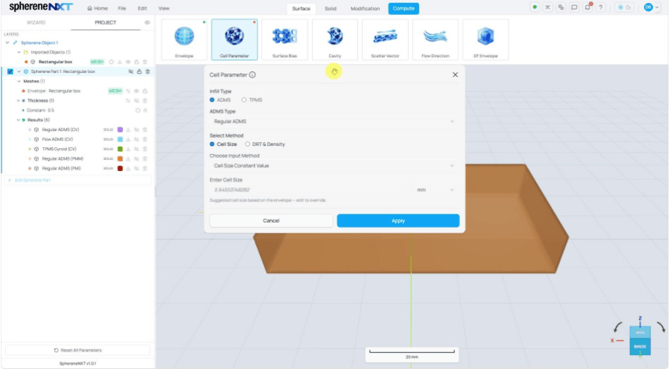
The Cell Parameter panel. Infill Type, ADMS Type, Select Method, Choose Input Method, and Enter Cell Size all live here.
Choosing Your Infill Type
Infill Type is the first choice you'll make, and it splits into two paths: ADMS and TPMS. ADMS (Adaptive Density Minimal Surfaces) is spherene's patented geometry. TPMS (Triply Periodic Minimal Surfaces) covers structures that are widely used across additive manufacturing, like gyroid and diamond lattices. We'll start with ADMS since it's the simpler path, then cover TPMS afterward.
Regular ADMS vs Flow ADMS
Once you're in ADMS, the ADMS Type dropdown gives you two options: Regular ADMS and Flow ADMS.
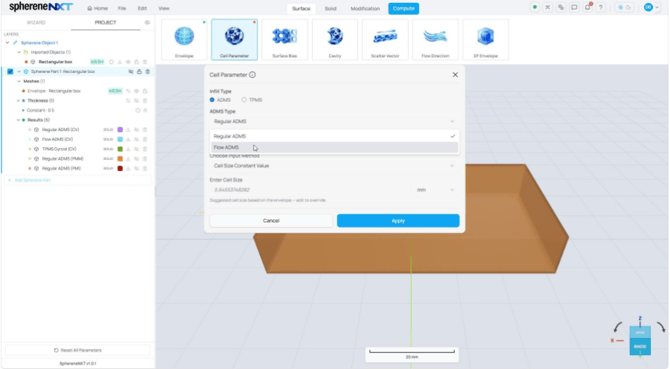
The ADMS Type dropdown, with Regular ADMS and Flow ADMS as the two options.
Tip: Flow ADMS is built with heat transfer and fluid applications in mind, but there's nothing stopping you from using it for mechanical or purely aesthetic design purposes too.
Select Method: Cell Size vs DRT and Density
Cell size is defined as the size of the “cell” of the infill lattice. Unlike those periodic lattices, ADMS does not have a unit cell that is the same everywhere; its cells vary spatially. By controlling the cell size, you can easily change the infill density locally.
Alternatively, sphereneNXT offers DRT and density as a second control method of the infill density. In this case, the infill local density is controlled directly by the given density values assuming the local wall thickness is DRT.
DRT stands for density reference thickness. A smaller DRT value gives you a smaller structure with smaller volumes. A bigger DRT value gives you a bigger structure. Density works in the opposite direction: a higher density means more material and more surface volume, which actually makes your structure smaller and denser.
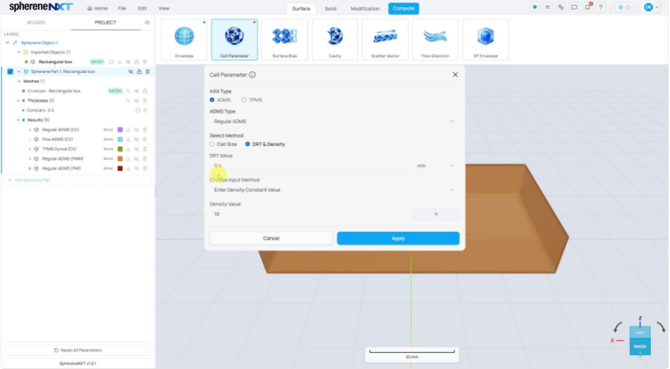
Switching Select Method to DRT & Density reveals two separate fields: DRT Value and Density Value.
Tip: Cell size is usually the easier choice since it's a single parameter. Reach for DRT and density if you want finer, more direct control over material distribution.
Running Your First Computation Cell Size Constant Value
For Choose Input Method, you'll see three options: Cell Size Constant Value, Cell Size Point Map, and Import from File. We'll start with the simplest, a constant value, using Regular ADMS.
Note: If you choose to import a file it needs to be CSV and in the format below.
The first three columns represent the coordination of the points (X, Y, Z) and the fourth column shows the magnitude (in this case, cell size), here is an example of a point map: Example point map.csv
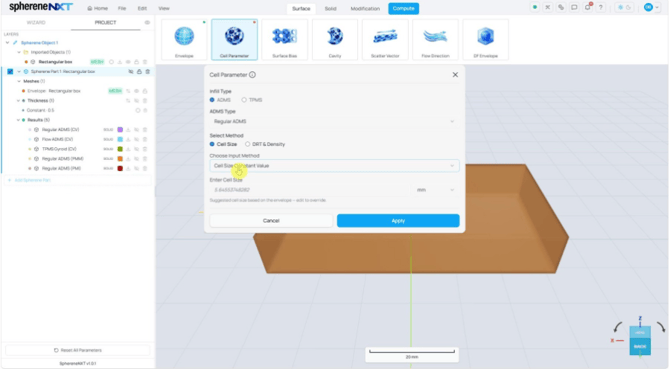
Cell Size Constant Value with a suggested cell size of 5.64mm, calculated automatically from the envelope.
The number you see here is a suggested cell size based on your envelope, typically landing you around 100 cells inside it. Want a looser, bigger structure? Increase the cell size. Want something denser and smaller? Decrease it. For this walkthrough, we'll keep the suggested 5.64mm.
Naming and Computing
Click Apply, then Compute. This opens a dialog where you name your result and set a few options before running the calculation.
Please select only “single surface” if you do not define thickness yet. Because all other output types require definition of the thickness before computing. See more details about how to set up thickness fields in Thicken Surface.
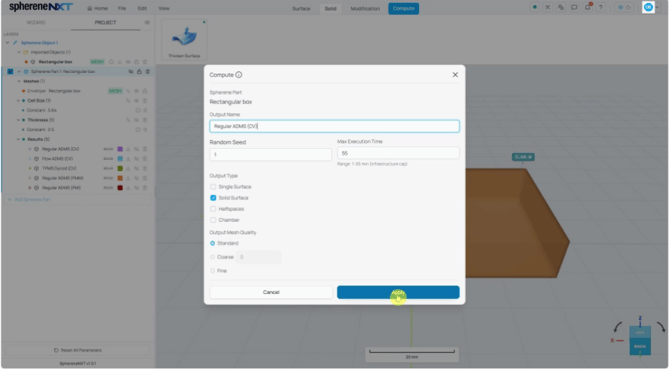
The Compute dialog: output name, random seed, max execution time, output type, and mesh quality.
Give it a name like Regular ADMS (CV), leave the rest at their defaults, and click Apply to run the computation.
Your First Result: Regular ADMS
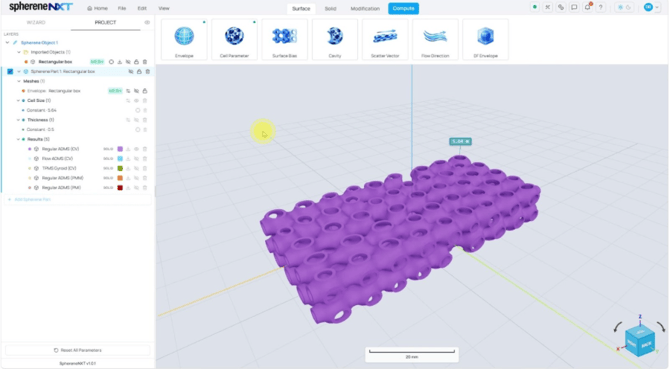
The result of Regular ADMS at a 5.64mm cell size.
Trying Flow ADMS
Go back to Cell Parameter, switch ADMS Type to Flow ADMS, and leave everything else as is, same 5.64 mm cell size. Apply, compute, and you'll get a noticeably different structure.
The Flow ADMS looks like flow-inspired geometry, which was originally designed to tackle challenges in fluid applications. It gives less fluid resistance and has balanced fluid resistance in the two chambers separated by the Flow ADMS surface.
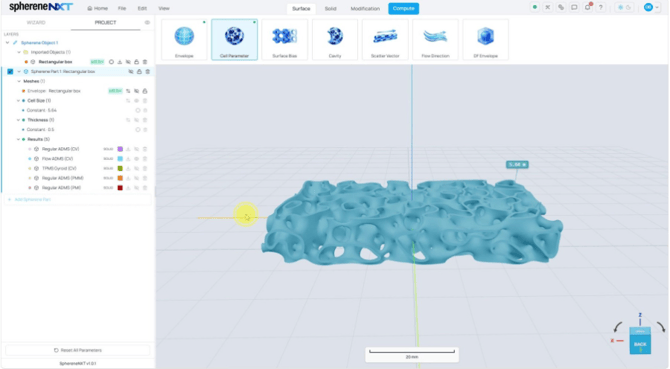
The same cell size, but Flow ADMS produces a more organic, porous structure.
Exploring TPMS
Switch Infill Type to TPMS and a new set of options appears. First, choose your TPMS type from spherene's library.
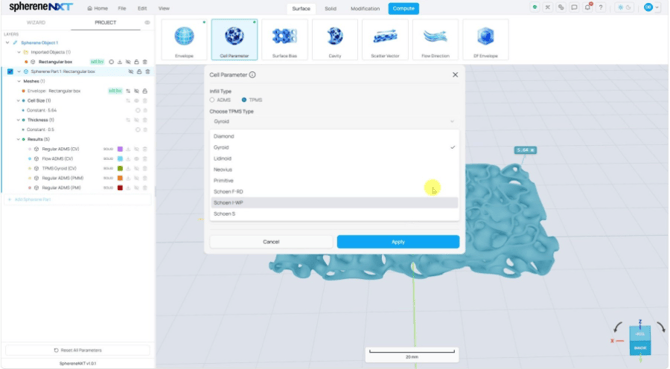
The TPMS library: Diamond, Gyroid, Lidinoid, Neovius, Primitive, Schoen F-RD, Schoen I-WP, and Schoen S.
Gyroid is a good starting point since it's the one most people are already familiar with.
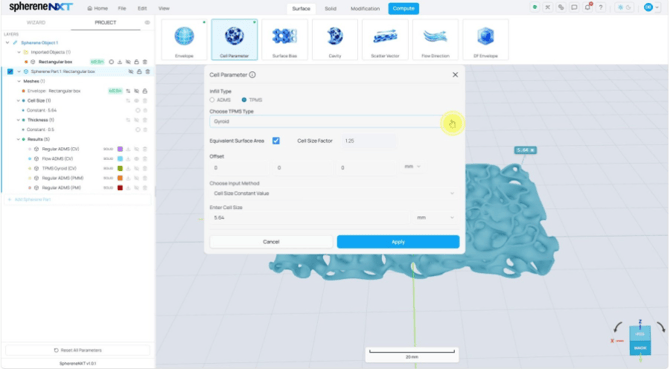
TPMS set to Gyroid, with Equivalent Surface Area checked and Offset fields visible.
Tip: Turn on Equivalent Surface Area if you plan to compare different TPMS structures against each other. Different TPMS types have different surface areas under the same cell size. Turn on Equivalent Surface Area will automatically adjust the cell size based on chosen TPMS type to ensure a similar surface area in the generated geometry.
Offset lets u move the TPMS structure within your envelope. We'll leave it at 0 for now and keep the same 5.64 mm cell size. Apply and compute to see the result.
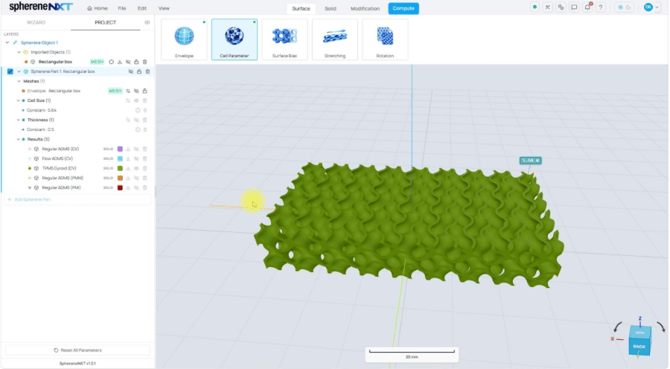
TPMS Gyroid at 5.64mm. Fully defined and ready to 3D print, no refinement or trimming needed.
Using Cell Size Point Map
So far we've used a single cell size across the whole structure. Cell Size Point Map lets you vary that size in different parts of your envelope, giving you a density gradient without hard edges or sharp transition region which causes stress/heat concentration and earlier failure. This is one of spherene's real strengths.
Setting Up Your Points
Back in ADMS, switch Choose Input Method to Cell Size Point Map. You'll get a table where you can add points and assign each one its own cell size.
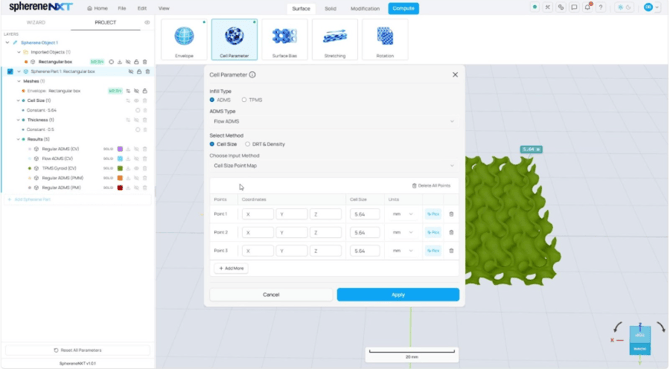
The Cell Size Point Map table, ready for coordinates and cell size values.
Enter the cell sizes you want at each point, for example 5, 9, and 12mm. One important thing: you need to turn on the envelope's visibility before you can pick points on it.
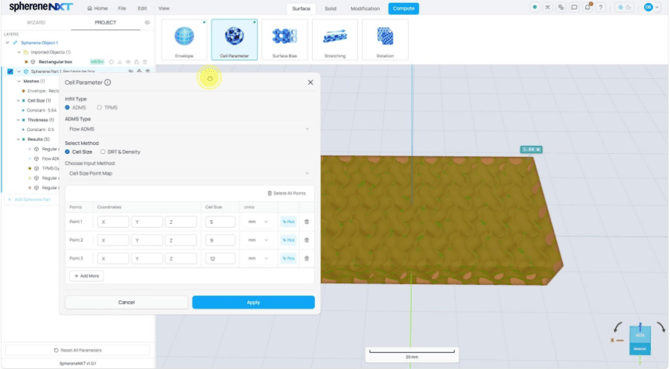
Cell sizes entered for all three points, with the envelope visible and ready for picking.
Picking Points on Your Envelope
Click Pick in each row of the points, then click a location on your envelope in the 3D viewer. Pick one point for your smallest cell size, another for the middle value, and a third for the largest. A continuous gradient of cell size will be created based on your defined points for infill structure generation.
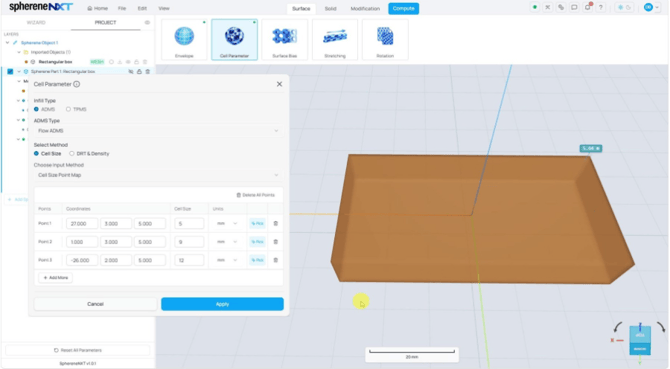
Coordinates filled in after picking three separate locations on the envelope.
Confirming Your Points
Once you apply, sphereneNXT shows your points directly on the model with their assigned values.
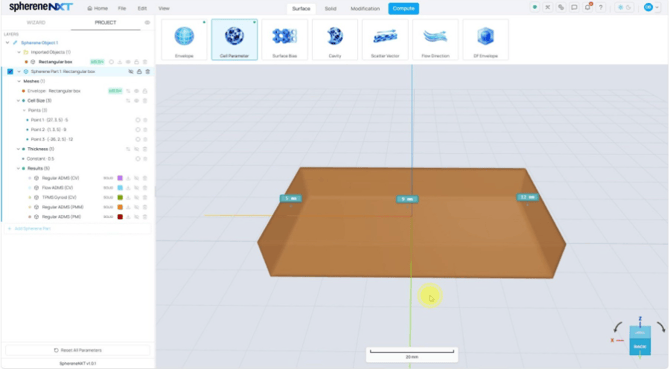
The three points shown on the envelope: 5mm, 9mm, and 12mm, left to right.
The Result: A Density Gradient
Compute, and you'll see the gradient come through clearly, smaller and denser where you picked 5mm, progressively looser toward 9mm and 12mm, with no sharp edges or sharp transition region in between.
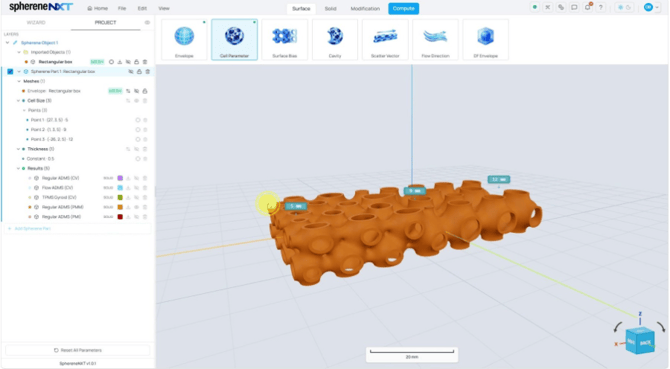
The computed result. Smaller, denser cells on the left, looser and bigger toward the right.
Importing a Point Map from File
If you already have a point map from a simulation, a pressure map, or any other source, you don't need to recreate it by hand. Choose Input Method has a third option for exactly this: Import from File.
Choosing Import from File
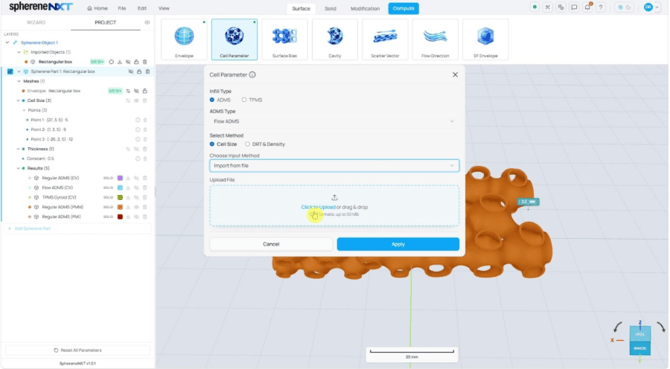
Import from File, with an upload area for your point map.
Click to upload or drag your file in. The format needs to be CSV. There are fou values in each row of the CSV file, which denote the x, y, z coordinates of the point and the corresponding value of cell size or density.
Selecting Your File
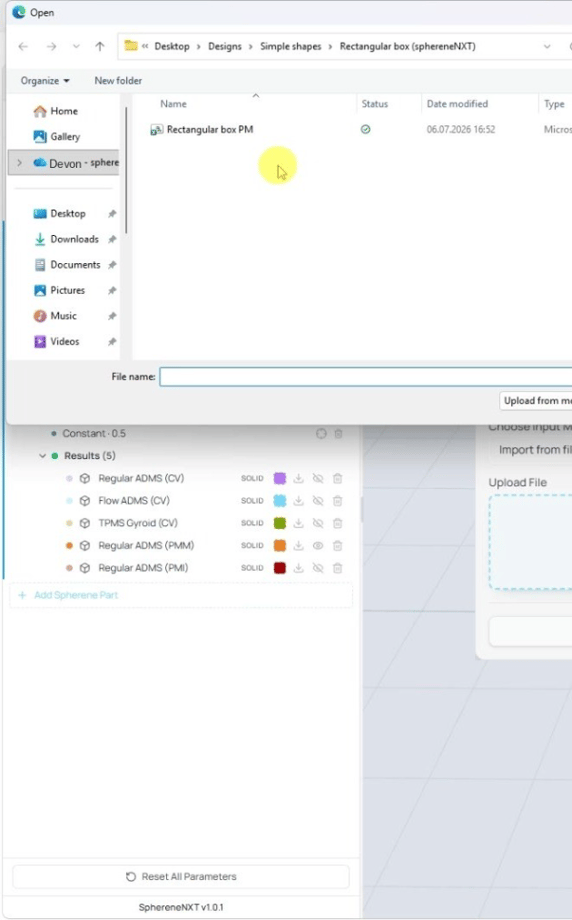
Select a CSV point map file to import.
Once you apply, you can choose to replace the points you'd set manually before or append the new coming points from the CSV as a point set with the manually defined points.
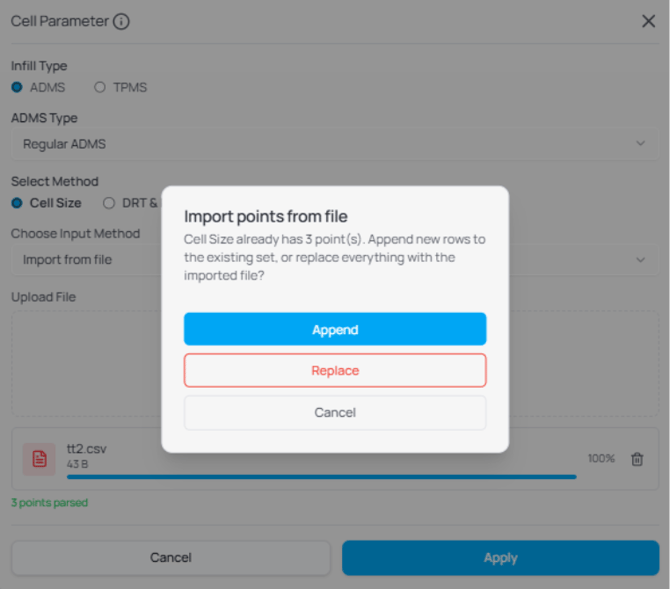
Replace the previous point or append points from CSV file to it.
Reviewing Imported Points
After the import, you'll see every point from your file listed and plotted, in this case, 115 separate points, each carrying its own cell size value.
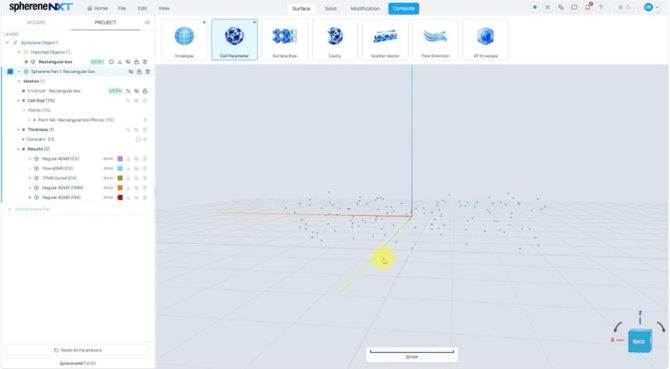
115 points imported from a CSV file, each with its own cell size value.
The Final Result
Compute one more time and the structure follows exactly what your point map data described, denser in the center, looser and bigger toward the outer areas, all driven by the data you imported.
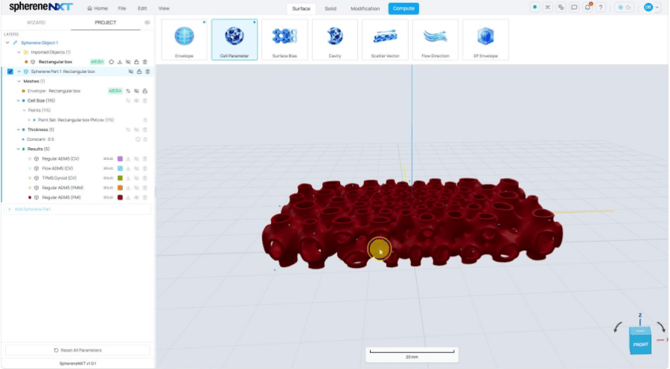
The final structure, shaped entirely by the imported point map data.
Quick Reference
|
Option |
What It Does |
Where to Find It |
|
Infill Type |
Chooses between ADMS (spherene's patented geometry) and TPMS (standard minimal surface structures). |
Cell Parameter panel |
|
ADMS Type |
Regular ADMS or Flow ADMS. Flow suits heat and fluid applications but works for other purposes too. |
Cell Parameter panel |
|
Select Method |
Cell Size for simplicity, or DRT & Density for direct control over material distribution. |
Cell Parameter panel |
|
Cell Size Constant Value |
Applies one cell size across your entire structure. |
Choose Input Method |
|
Cell Size Point Map |
Lets you set different cell sizes at different picked points for a density gradient. |
Choose Input Method |
|
Import from File |
Imports a ready-made point map from a CSV file instead of picking points manually. |
Choose Input Method |
|
Equivalent Surface Area |
Normalizes cell size to get equivalent surface area across different TPMS structures for a fair comparison. |
TPMS options |
|
Offset |
Offset of the mapping between TPMS structure and the envelope |
TPMS options |