
What Simulation Does
Simulation predicts how a part responds to static loads. It runs a linear static structural analysis, which assumes a linear elastic material and small deformations. You use it to see where a design carries stress and how far it displaces under the conditions you define.
It works on the geometry you generate in sphereneNXT, whether that is an ADMS, TPMS, or beam structure. The geometry is meshed and solved directly, not replaced with a simplified stand-in.
Good to know: A linear static result assumes small deformation and no nonlinear behavior, and its accuracy depends on the mesh. Refine the mesh and confirm the result stops changing before you trust a number.
Two Ways to Use It
Simulation is a separate step. You can run it before you compute an infill, to guide the design, or after, to verify it.
- Guide the design. Simulate against your envelope and load case first to see where material is most needed, then design the infill from that read.
- Verify the design. Simulate the generated infill structure to confirm it meets the mechanical requirement you set.
How a Study Is Organized
Every simulation lives inside a study. A study holds five sub-layers, in this order: Geometry, Material, Load Cases, Mesh, and Results. This series follows that structure from top to bottom, so each article builds on the one before it.
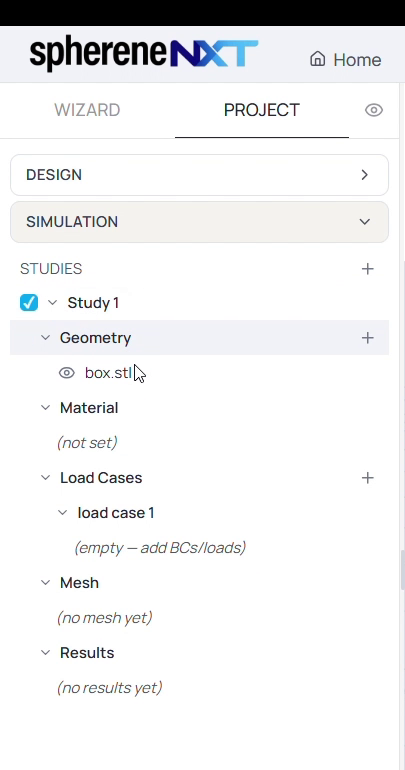
Figure 1. A simulation study in the layer tree, with its Geometry, Material, Load Cases, Mesh, and Results sub-layers.
The Series
Work through these in order.
-
Part 1: Starting a Study. Switch to the Simulation section and create a study from your geometry.
- Part 2: Assigning Materials. Set the material properties the solver needs.
- Part 3: Constraints and Loads. Build load cases from constraints and loads.
- Part 4: Meshing and Mesh Quality. Generate a mesh and check that it is sound.
- Part 5: Solving a Study. Choose a solver and run the job.
- Part 6: Viewing Results. Read result fields on the mesh, with statistics, probing, and deformation.
- Part 7: Analyzing Results. Get statistics for a result field over a region you select.
- Part 8: Exporting a Point Map. Export the result as a point map to drive a density field.
Before You Begin
You need at least one model in the design space before you can start a study. Simulation assumes some basic familiarity with structural analysis, though the defaults are set to steer you past the most common setup errors.
Next Article
sphereneNXT Simulation (Part 1): Starting a Study